I’m been working on a new direct conversion receiver build recently, with a focus on using discrete components as much as possible. In the past I have built a direct conversion receiver using an MC1496, using N6QW’s design, but I’ve been wanting to experiment with building my own double balanced mixers and diplexers. I’ve decided to still use an Arduino/Si5351 based VFO, while attempting to keep everything else analog.
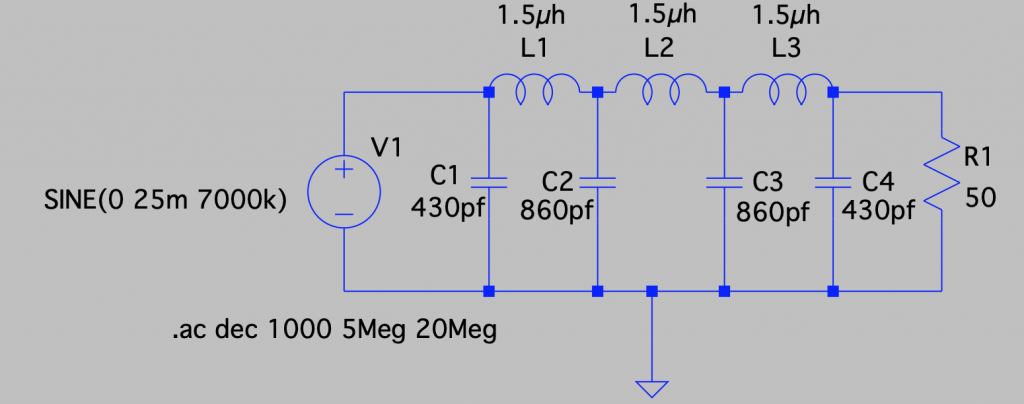
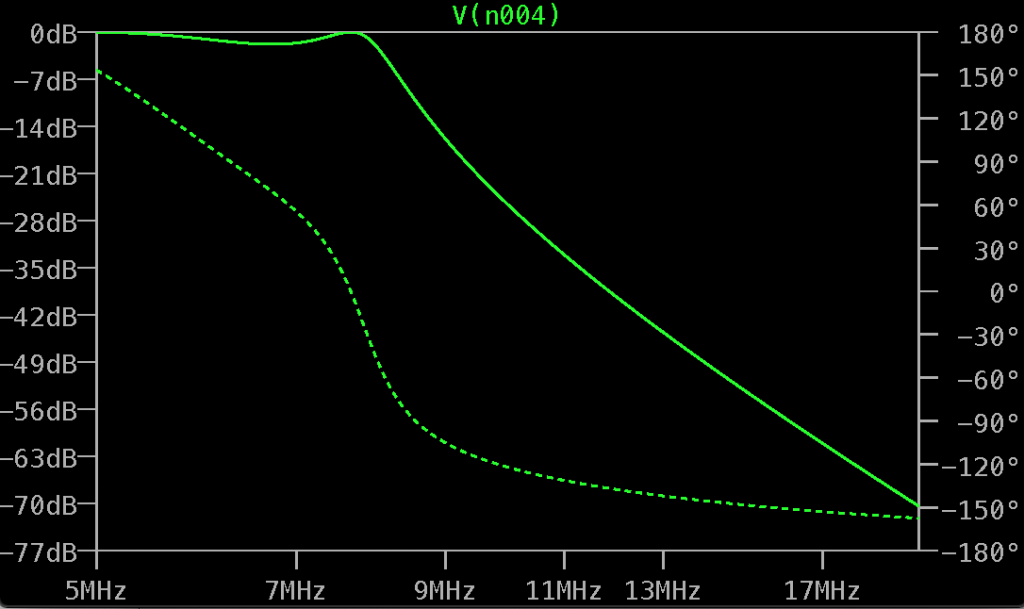
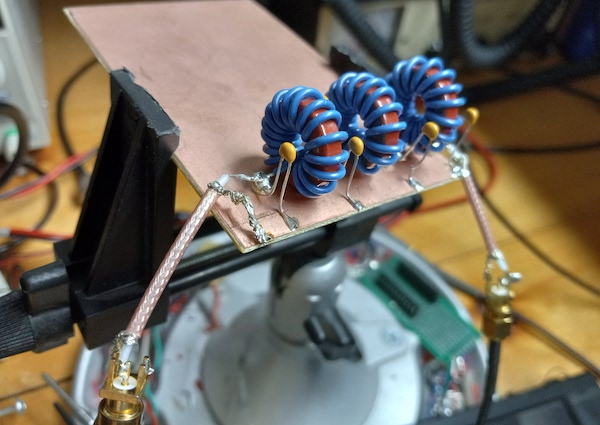
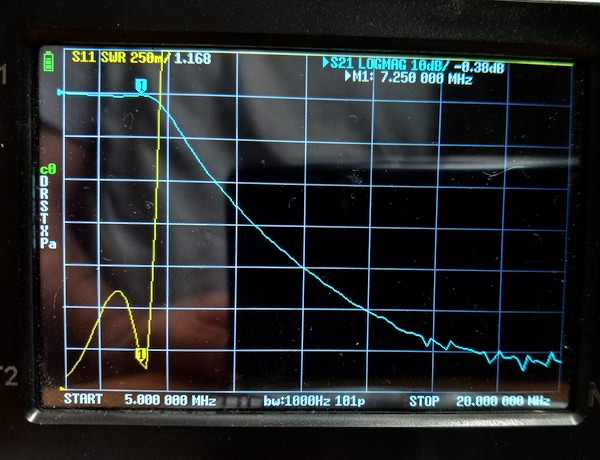
Bandpass filter
The bandpass filter was a slightly modified version of one I used in a previous project. The inductors are 17 turns on a T62-8 toroid to produce 2.28µH. I used 7-45pF variable capacitor for the centre, and two 10-50pF variable capacitors at each end to allow for tuning with my NanoVNA:


VFO
The VFO consists of an Arduino Pro Mini and Si5351. The code can be found on my GitHub page. I’m hoping to post a full article on this soon.
Mixer
For the mixer, I used 1N5711 diodes and matched them by comparing their voltage drop with the diode feature of my multimeter. An improvement would have been to test these at a higher current to match the what they are likely to see when used in the actual mixer configuration. Nick M0NTV has a great video on this and I will likely give this method a try in the future.
The transformers are 10 turns of trifilar wound #28 enamelled wire on an FT37-43.
Diplexer and Preamplifier
For the diplexer, it is important to provide a proper termination to the mixer to reduce reflections and provide the best performance. To provide that 50Ω termination at RF frequencies, the diplexer consists of a series 0.1µF capacitor and 51Ω resistor shunted to ground. This is followed by a 100µH inductor (17 turns on a FT37-43 toroid) and 0.47µF capacitor that form a low pass filter to pass our audio frequencies to the preamplifier stage.
The preamplifier consists of a common base configuration that provides a 50Ω termination to the double balanced mixer. I first became aware of this method in an article by Rick Campbell KK7B, “High Performance Direct-Conversion Receivers“, but the idea also goes back to years earlier in W7EL, Roy Lewallen’s, “An Optimized QRP Transceiver“. With a common base amplifier, the input impedance is low and is determined mostly by re. This is because re tends to be small compared to RE, and therefore dominates the input resistance. re can be calculated using the following formula: re = 26mV/IE (where IE is measured in milliamps). Therefore, if we can establish 500µA current, we can produce an impedance very close to 50Ω (ie. 26mV/0.5mA). LTSpice analysis verified this. Wes Hayward also talks about this concept in his article “An Audio Feedback Amplier for DC Receivers“, where he discusses some potential downfalls of the common base approach, such as when encountering strong signals. He recommends an alternative approach using feedback with the additional benefit of termination insensitivity. I recommend reading the article, it was interesting and this is something I’d like to try in a future build.
In addition to the common base preamplifier, I’m also using an active decoupler to prevent any potential feedback or hum in the power supply, similar to Rick and Roy, and an emitter follower to drive the next audio stage.
Audio Amplifier
The audio amplifier is a design taken from Experiment #167 from the book “Hands-On Radio Experiments” (originally from “Experimental Methods in RF Design”). This was a good fit because it provides high gain and is matched well to the proceeding preamplifier. I used a 500Ω potentiometer as the volume adjustment between these two stages. This amplifier uses a paralleled combination of 100kΩ resistor and 220pF capacitor as feedback for both the buffer stage and from the output back to the second opamp. I’ve found this provides strong attenuation of frequencies below 300hz and above 7kHz. I didn’t have the recommended NE5532 at the time of building, so I used LM741 instead, being aware that the performance will likely be affected negatively by this compromise.
Full Schematic
LTSpice file is available on my github.

Testing
Overall, I am quite happy with how this turned out. You can see a video of a recent test below.